It's officially the first day of spring! I love the excitement that comes with this season- plants are coming back to life, days are getting lighter, people are breaking out of hibernation mode. Lots of great energy is surfacing!
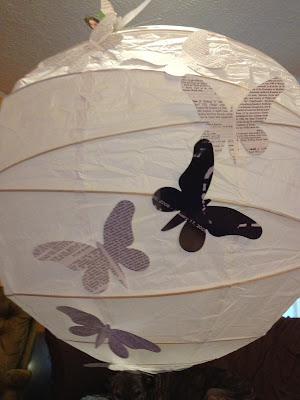
Butterflies are a perfect symbol of new life and the beautiful, light colors of spring- so I chose them for my most recent spring themed decor project. The goal was to create lighting that would brighten and add unique seasonal detail to a shop window- while keeping supply costs low.
I chose to use pendant light cords , white paper lanterns in three sizes and upcycled paper butterflies as the primary materials.

INGREDIENTS:
24" White paper lanterns
16" White paper lanterns
14"White Paper lanterns
Silver electrical cord kit
Old magazines
An old book
Hot glue gun
Hot glue sticks
Light Bulbs
MAKE IT:
First:
Either die cut/ hand cut butterfly silhouettes. If you're a Nashville local check out Turnip Green Creative ReUse as an excellent source of paper you can upcycle; similar organizations exist in many other major cities as well- look into it where ever you are! Die cutting will be WAY faster and will give a "cleaner" look to your butterflies; if you have access to a die cutter, I recommend it over hand cutting. As far as the amount to cut- it really depends on how minimal vs ornate of a look you want, as well as how big of a lantern you chose to use. Always cut more than you think you will need- you'll be happy to have spent a little extra time cutting and have extra than to be in the midst of hot gluing only to realize you've run out!
Second:
Assemble your lantern/s. If possible hang them in your work area. It was very helpful for me to have it hanging while I was working on it, so I could be sure to place the butterflies the way I envisioned them looking on the finished product (which would hang in a window).
Third:
Lay out your butterflies and get that hot glue gun going. Imagine roughly where you want your butterfly "swarm" to land on the lantern. Begin gluing some butterflies on- start off by attaching them smoothly/flatly as seen below.
Fourth:
Go back to your stack of paper butterfies and crease some of them. As you make a 2nd pass over the lantern attaching butterflies this will add interest- some butterflies will appear to be resting, some will be perched with wings still "fluttering". Using a bit of hot glue along the crease, press these on top of and around the flat butterflies.
Fifth:
Be sure to move around the lantern as you work so that one side does not get considerably bulkier than the other. Continue to add butterflies as you go, alternating book and colorful magazine pages.
Sixth:
Once you're happy with your butterfly coverage, carefully insert the cord with lightbulb and hang!
If you have any left over butterflies, thread them onto fishing line (simply punch a small hole in the paper and knot the line). Tie the strand below the lantern or to the ceiling hook above and let them flutter around the lantern; add a couple varied lengths if you're really into it!
The above pic is my end result. It can currently be seen at Rodney Mitchell Salon in Hillsboro Village.
Happy first day of Spring!


No comments:
Post a Comment